Since after two major releases, Apple brought rapid evolution to secure their macOS Volumes where it is too much difficult to make any changes on the root volume. They have made cryptographical ways to access their root volume which is not possible to do if you are a newbie. In this article, I will show you how we can access and Write Access on Big Sur and newer OS also this guide also works on Catalina.
To Enable Write Access on Big Sur, the Primary step is to disable System Integrity Protection (SIP) and Disable cryptographic verification all this can be done in the following way. Ideally, if you are a Legit mac user you can simply boot into Recovery and use the following commands which can disable SIP and cryptographic verification.
csrutil disable
csrutil authenticated-root disable
If you are Clover or Open Core user then kindly follow the way.
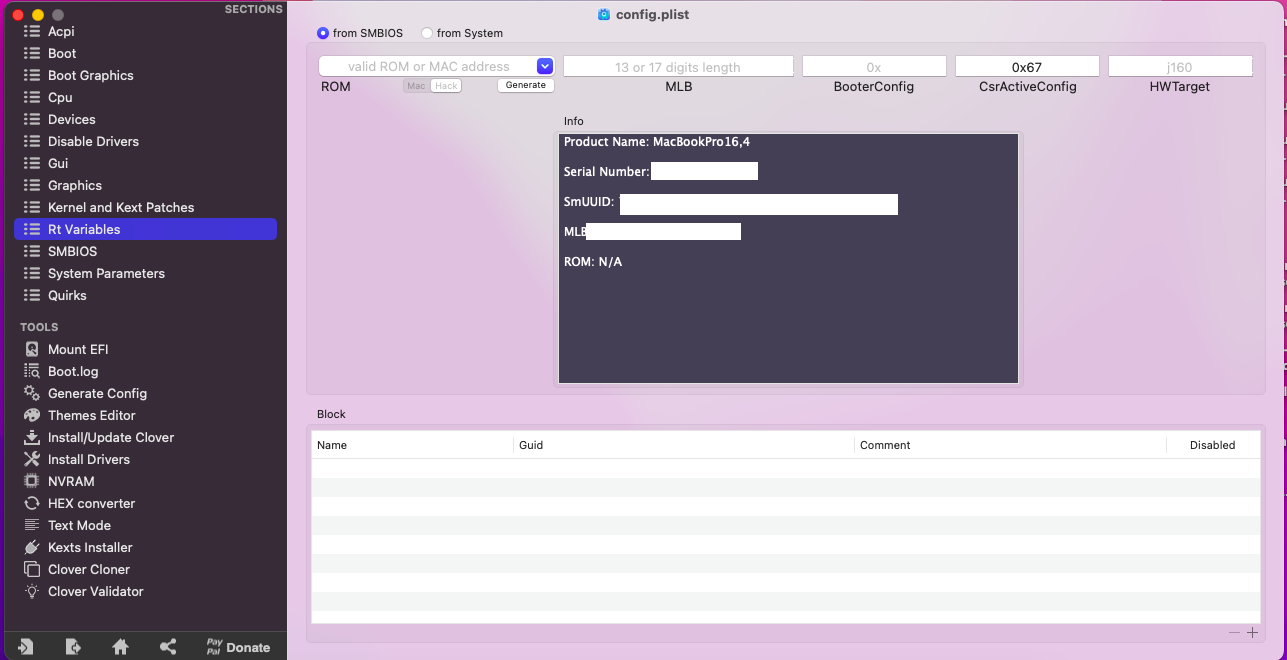
- Open config.plist in Clover Configurator
- Navigate RT Variables > CsrActivateConfig
- Change CsrActivateConfig to the appropriate value
- Disable SIP: 0x67
- Enable SIP: 0x00
- Reboot Hackintosh to apply changes
How to Enable Write Access on Big Sur
For OpenCore Procedure would be a little different where you need to add entries of csr-active-config in the following location and based on your Operating system you can put your values
Our Other Articles
10 Cheapest GTX GPU For Hackintosh
Top 10 Cheap NVIDIA GPU For Hackintosh
Top 3 Liquid Water Cooler For Hackintosh
TL-WDN4800 PCI Express WiFi Card
NVRAM -> Add -> 7C436110-AB2A-4BBB-A880-FE41995C9F82 -> csr-active-config)
00000000– SIP completely enabled (0x0).03000000– Disable kext signing (0x1) and filesystem protections (0x2).FF030000– Disable all flags in macOS High Sierra (opens new window)(0x3ff).FF070000– Disable all flags in macOS Mojave (opens new window)and in macOS Catalina (opens new window)(0x7ff) as Apple introduced a value for the executable policy.FF0F0000– Disable all flags in macOS Big Sur (0xfff) which has another new flag for authenticated root (opens new window).
The root volume is now a cryptographically sealed apfs snapshot. Every single bit of the fsroot tree and file contents are verified when they are read from the disk. So It is no longer possible to boot a “live” filesystem, that is, one that can be written to. You can instead disable authentication of the root volume by booting to recovery and running the following command in Terminal
csrutil authenticated-root disable
Once you’ve done that, you can mount the live version of the root filesystem, make modifications to that, and then make a new snapshot. You can then boot from that snapshot. Synthetic symlinks and directories still work just fine in a Signed System Volume. Mounting the live filesystem after disabling root authentication can be done via the following command but before everything make sure to create a mount point.
$ mkdir /Lucifer
$ sudo mount -o nobrowse -t apfs /dev/diskNsM /Lucifer
diskNsM can be obtained by running `mount`, looking for the root mount’s device, and chopping off the last s, e.g. if your root is /dev/disk1s2s3, you’ll mount /dev/disk1s2 The mount point is anything you choose. Once you’ve got the live mount at /path/to/mntpoint, you can modify stuff. After your modifications are complete, run
$ sudo bless --folder /Lucifer/System/Library/CoreServices --bootefi --create-snapshot
Then reboot, and you’ll be booted from the new snapshot you created, with your modifications honored. Authentication is disabled and the source is Twitter.